


Every year, UK drivers face mounting costs from vehicle damage, with motor insurers paying out a record £11.7 billion in car insurance claims in 2024. Bumper damage represents one of the most common and costly repair issues affecting British motorists today.
The financial impact is substantial. Depending on the extent of damage and the type of vehicle involved, prices for intensive repairs can start from £200 and reach upwards of £400. For more severe damage, repairing damage to a car bumper could cost £60-£1,320 depending on severity. These escalating costs have contributed to insurance premium increases, with average car insurance costs increasing by £284 (43%) over the last 12 months.
Beyond the immediate financial burden, bumper damage affects vehicle safety and aesthetics. Modern bumpers contain sophisticated safety systems including sensors, cameras, and impact-absorbing materials. Proper maintenance and timely repairs protect both your investment and road safety.
Car bumpers take a beating from daily driving. Whether you need to replace a damaged bumper or clean stubborn soot buildup, knowing the right methods makes all the difference. This comprehensive guide covers both processes with practical advice for UK drivers, helping you avoid costly professional fees while ensuring quality results.
UK bumper repair cost analysis
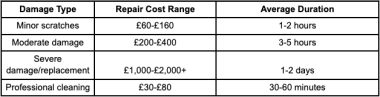
Data compiled from UK automotive repair industry sources, 2024
Modern vehicles feature different bumper designs, each requiring specific handling techniques. Learning about types of car bumpers from autodoc.co.uk helps you identify the correct replacement parts and tools needed for your specific vehicle model.
Essential tools and equipment
Before starting any replacement work, gather the right equipment. You’ll need basic hand tools including screwdrivers, socket wrenches, and trim removal tools. A jack and axle stands are essential for accessing mounting points safely. Keep a digital camera handy to photograph connections before removal – this saves time during reassembly.
Professional mechanics recommend having replacement clips and fasteners ready. These small parts often break during removal and can delay your project if you don’t have spares.
Critical safety measures
Never attempt bumper work without proper safety measures. Always disconnect the car battery before starting, especially if your bumper includes electrical components like sensors or lights. Work on level ground and use appropriate lifting equipment.
Wear safety glasses and gloves throughout the process. Bumper edges can be sharp, and broken plastic creates hazardous fragments. Keep your workspace clean and well-lit to avoid accidents.
Professional replacement guide
Start by removing interior panels that provide access to mounting bolts. Most bumpers attach through the wheel wells, underneath the vehicle, and behind the grille area. Take photos of each connection point before disconnecting wiring harnesses or sensor cables.
Remove fasteners systematically, working from one side to the other. Modern bumpers often use a combination of screws, clips, and push-pins. Don’t force stuck fasteners – apply penetrating oil and wait before trying again.
Installation reverses the removal process. Ensure all electrical connections are secure and test lights and sensors before final assembly.
Effective soot removal methods
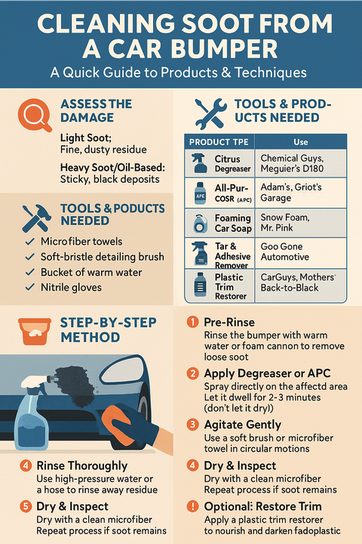
Professional soot removal guide showing assessment methods and step-by-step cleaning process.
Soot buildup creates unsightly black marks that regular washing won’t remove. The severity of contamination determines your approach – light, fine dusty residue requires different treatment than heavy, oil-based sticky deposits.
Start with warm soapy water and a microfibre cloth for light contamination. For heavier deposits, use dedicated automotive cleaners designed for plastic surfaces. Chemical degreasers like Meguiar’s D180 work effectively on stubborn oil-based soot, while all-purpose cleaners such as Adam’s Car Wash handle moderate buildup.
The most effective approach follows a systematic method. Begin by pre-rinsing the bumper with warm water to remove loose soot particles. Apply your chosen degreaser or all-purpose cleaner directly to affected areas, allowing 2-3 minutes dwell time without letting it dry. Use gentle circular motions with a soft brush or microfibre towel to agitate the contamination.
Expert opinion from AUTODOC states: “Penetrating oil WD-40 commonly used for tar removal.” This approach works well for sticky residues, but test on a hidden area first to ensure it won’t damage your bumper’s finish.
For persistent stains, specialized products like Goo Gone Automotive or CarGuys plastic trim restorer provide targeted solutions. Snow foam from brands like Mr Pink creates effective pre-treatment for heavily soiled surfaces. Always rinse thoroughly with high-pressure water and dry with clean microfibre cloths to prevent water spots.
Long-Term maintenance strategies
Regular maintenance prevents severe contamination. Wash your bumper weekly, paying attention to areas where road grime accumulates. Apply plastic protectant monthly to create a barrier against dirt and UV damage.
Park away from construction sites and industrial areas when possible. These environments accelerate soot buildup and can cause permanent staining if left untreated.
Following these guidelines ensures your bumper stays looking good while maintaining your vehicle’s safety systems.
Written by Alena Kirsanova